As I promised from my previous post, I am going to post the basic of 3D object creation for solid base modeling. This post should serve as general guidelines for all CAD software as their basic principles are the same. There's only slight difference in terms of the interface and options.
To start with, let me tell you the basic operation of 3D solid base modeling. All the 3D objects are created from 2D sketch. Then this 2D sketch is being manipulated by 3D feature to create 3D object.
Creating 2D sketch
To begin with, you need to create a 2D sketch. The sketch must be sketched on a sketching plane. All CAD software would have 3 default sketching plane, the Top Plane, Front Plane, and Right Plane. It is recommended to create the first sketch on either one of this sketch. In future, additional plane could be created if it is necessary.
Default initial sketching plane
After the sketch is created, you could start making the 3D model using the features. Here is the basic features that all is widely used by all 3D CAD software available.
Extrude
The basic of extrude feature is to "pull" the 2D sketch to direction perpendicular of the sketch. See image below for clearer illustration. Other options such as draft angle varies according to different CAD software.
Basic of extrude feature
Revolve
The basic of revolve feature is to create a closed loop 2D sketch and an axis of revolution. The solid model would be radially symmetric to its axis of revolution. See image below for clearer illustration.
Basic of revolve feature
Extrude and revolve are two of the most basic feature to create a solid as it can be created using sketch that lies on the same plane. The subsequent feature require more than 1 sketch that must lie on a different sketching plane.
Sweep
To do sweep operation, you need to have a closed loop 2D sketch (referred as the profile) and a sweeping path (referred as the path) that does not lie on the same sketching plane as the sweep profile. Whether or not the path should intersect with the profile varies widely according to different software. Refer to image below for better illustration.
Basic of sweep feature
Loft
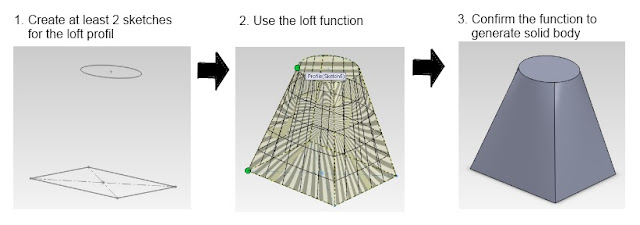
To make a lofted profile, you need to have at least 2 close loop sketches. The loft function then would fit in a solid that passes through/fit the profile. To understand better, see the image below. We see that loft function would fit a profile that changes gradually from a rectangle into a circle.
Basic of loft feature
To form a complex model, we can not use only one feature. We need to use multiple features one after another. Generally, all the feature above could be used to form solid, or to remove them. All the used features then would be stacked one after another on the model tree.
Add material
To understand how we build feature after another, imagine if we have a cube as shown below after doing an extrude feature.
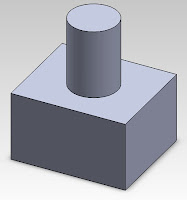
We then can draw a circle on the top face of the cube.We then could do extrude feature on the circle to form a solid as shown below:
Cut material
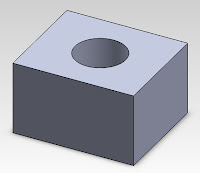
Now imagine we have the same cube as shown above. Instead of adding a cylinder on top of it, I could select extrude cut which would remove material in shape of cylinder, instead of adding material on top of it. As a result, you would get something like this:
And that is what I mean by stacking feature after feature. In this case, only 2 features are being used. In a complex model, up to 30 feature is quite a common thing.
And now you have understood the basic operations, and literally, you now you could start building your own 3D model!


Where can i buy a CAD design software called "tex pro"?
ReplyDeleteSolidworks Support
Not everywhere you can find a good 3d modeling services Houston, Texas. It needs more experience to get a mesmerizing result. You can visit us to have a accurate 3d model.
ReplyDelete